
You can actually save voicemails from your iPhone straight to a computer. It's pretty straightforward—just open the Phone app, pick a message, hit the Share button, and then send it via Email, Messages, or just save it to the Files app. This creates a separate audio file that you can easily grab and store on your Mac or Windows PC.
Why Saving Your iPhone Voicemails Is So Important
We often think of voicemails as just missed calls, but they can be so much more. They're like little digital keepsakes. A message might be the last happy birthday wish from a grandparent, or for professionals, it could be a verbal agreement from a client or crucial project details you simply can't afford to lose.
Just letting those important audio files sit on your iPhone is a massive risk.
The Dangers of Device-Only Storage
Relying only on your phone means those irreplaceable messages are one mishap away from being gone forever. A software update that goes wrong, a clumsy drop, or an unexpected system crash could wipe out your voicemails in a flash.
This is exactly why figuring out how to save voicemails from your iPhone to a computer is so critical. For more handy tips on managing your phone's communications, have a poke around on our blog.
It's not just about accidental loss, either. Your mobile carrier has its own limits. Here in Australia, major providers like Telstra, Optus, and Vodafone typically cap your voicemail box at around 20 to 30 messages. Once it's full, your phone just stops taking new ones, and you could miss out on important calls.
Even worse, if you decide to switch carriers, your old voicemail box and everything in it gets permanently deleted. Backing them up to your computer is the only way to be sure you've got them for good.
Securing Your Most Important Messages
Losing your data is a very real possibility. In fact, some data shows that nearly 40% of Australian smartphone users have lost data from accidental deletions or system glitches. When you export your voicemails, you're creating a permanent, accessible archive that doesn't depend on your device or your carrier.
This move gives you complete control and, honestly, a lot of peace of mind. You can read more about the research behind mobile data loss to get the full picture.
This isn't just about storage; it's about preservation. By moving voicemails to your computer, you're turning fleeting audio clips into a secure, organised, and permanent record of your personal and professional life.
Using Your iPhone's Built-In Sharing Tools
Sometimes, the best solution is the one you already have tucked away in your pocket. Before you start looking at third-party apps, it’s worth remembering your iPhone is already equipped to save individual voicemails to your computer. The magic lies in the native iOS Share Sheet—that simple but powerful menu that pops up when you want to send something.
This built-in feature is perfect for those one-off situations. Think about a client leaving crucial project details, or a heartfelt message from a family member you want to cherish forever. The Share Sheet makes saving these moments incredibly simple, with no fuss involved.
Your Go-To Sharing Options
When you tap the Share icon on a voicemail, your iPhone gives you a few direct routes to get that file off your phone. Each one has its own practical perks, depending on what you need and how you work.
You can easily:
- Email it to yourself. This is the classic, old-faithful method. Just send the voicemail as an audio attachment to your own email, then open it and download it on your Mac or Windows PC.
- Save to Files. This one's a lifesaver for anyone in the Apple ecosystem. It saves the voicemail directly to your iCloud Drive, meaning it’ll automatically show up in the Files app on your Mac or any other device signed into your Apple ID.
- Send it via Messages. You can flick the voicemail over in a message to a trusted friend or even to your own number (if your carrier allows it), creating a quick backup copy.
- Transfer to Voice Memos. This is a clever little workaround. Sending the file to Voice Memos adds it to an app that syncs via iCloud, making the audio pop up on all your Apple devices.
This image shows just how smoothly saving a voicemail to the Files app works, helping you organise your audio files right on your computer.
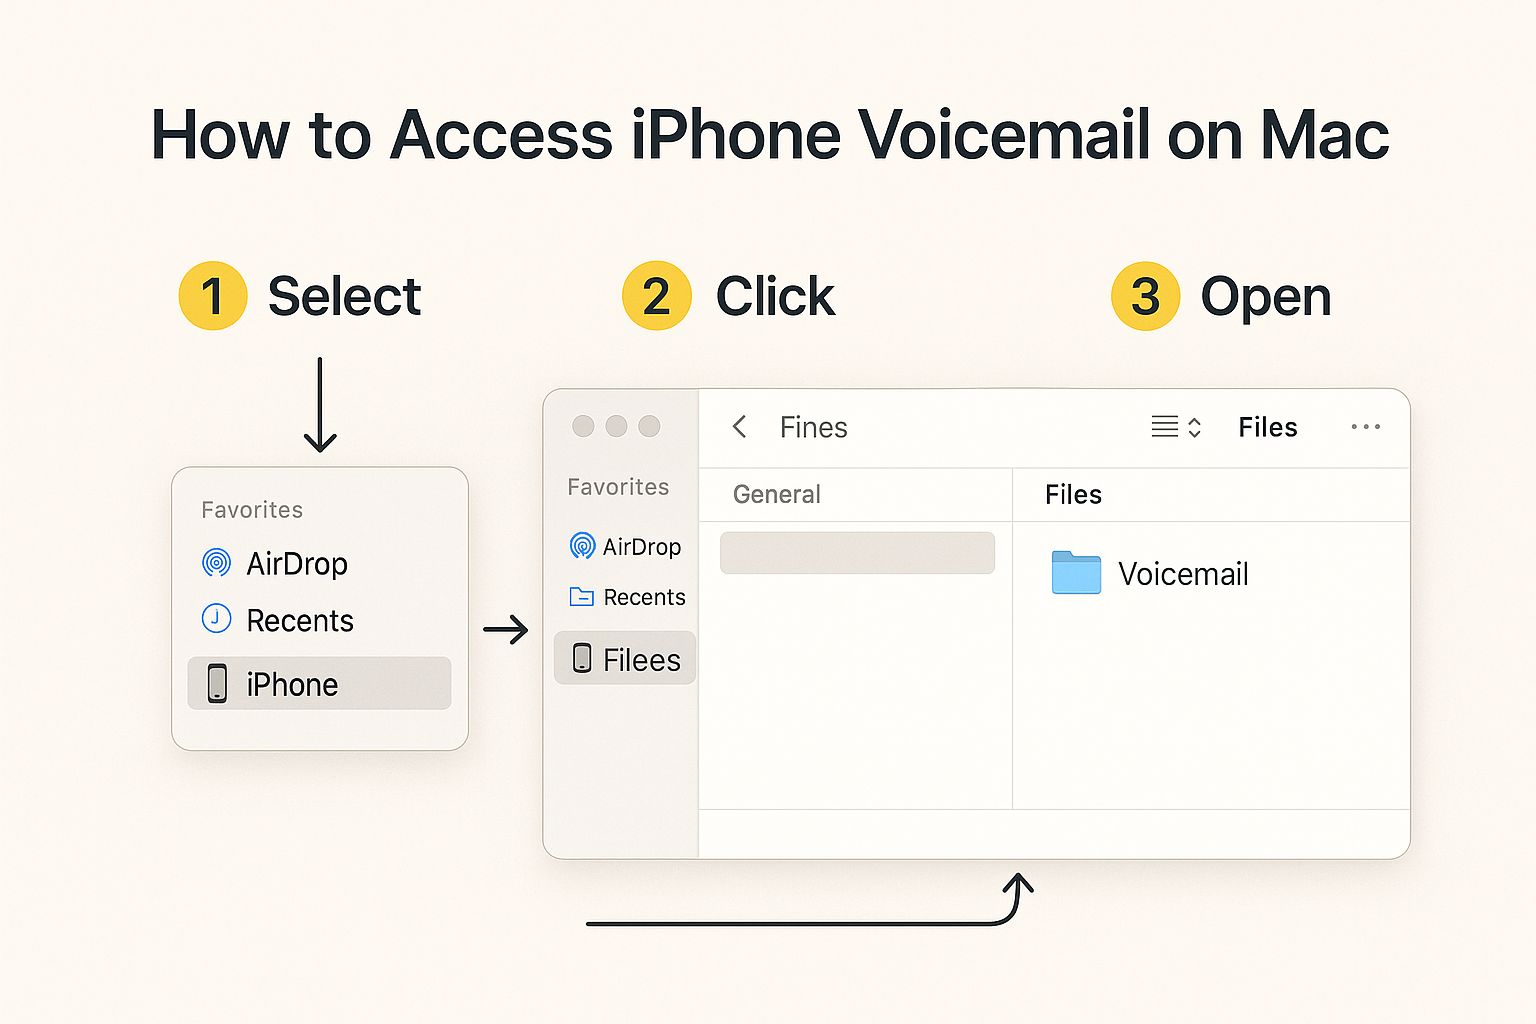
As you can see, once it's saved to iCloud Drive through the Files app on your iPhone, the voicemail appears seamlessly inside Finder on a Mac. From there, it's ready to be stored permanently.
Making the Process Work for You
Knowing how to get voicemails from your iPhone to a computer is becoming a vital skill, especially when an estimated 78% of Australian adults now own an iPhone. For so many of us, these audio messages are a key part of how we do business and stay in touch. The process is straightforward: navigate to your voicemail, pick a message, and hit the Share icon to send it to a cloud service like iCloud Drive or your email. It’s the most direct way to keep this information safe.
If you're keen to dive deeper, you can find more tips on iOS data management on TechRepublic.com.
The biggest catch with these built-in tools is that you can't save messages in bulk. You have to share each voicemail one by one. It's fine for a few important files, but it gets pretty tedious if you’re trying to archive your entire inbox.
Deciding which method to use really comes down to your personal workflow. Let's break down the most common options to help you choose.
Comparing Built-In iPhone Sharing Methods
Here's a quick comparison of the native iOS methods for saving a voicemail, so you can pick the best tool for the job.
| Method | Best For | Pros | Cons |
|---|---|---|---|
| Universal access on any computer (Mac or Windows). | Simple, reliable, and works with any email client. | Can clutter your inbox; attachment size limits might be an issue. | |
| Save to Files | Seamless syncing within the Apple ecosystem. | Appears automatically on your Mac and other Apple devices. | Requires iCloud setup and isn't as direct for Windows users. |
| Messages | Creating a quick, informal backup. | Fast and easy for sharing with others or yourself. | Not ideal for permanent archiving; can get lost in message history. |
| Voice Memos | Organising audio files alongside other recordings. | Syncs across Apple devices and offers basic editing tools. | Adds an extra step; less direct than saving straight to Files. |
Ultimately, if you're a Windows user, emailing the file is your most foolproof bet. But if you live and breathe Apple, saving to Files or Voice Memos offers a slick, almost invisible syncing experience that's hard to beat.
Seamless Voicemail Transfers to a Mac

If you’re already part of the Apple ecosystem, you're in luck. The tight integration between iPhones and Macs makes saving voicemails incredibly straightforward. You can often sidestep the need for cables or clunky third-party software altogether.
Apple has built some brilliant native features right into its devices, designed to work together seamlessly. For Mac users, this means a few clicks are often all that stands between a voicemail on your phone and a secure file on your hard drive.
The Magic of AirDrop
AirDrop is, without a doubt, the fastest and most direct way to zap a single voicemail over to your Mac.
Let’s say you’re a real estate agent and just got a voicemail with a verbal offer on a property. You need that file on your Mac right now to attach to the client's digital file. No mucking around.
Using AirDrop, the process is almost instant:
- Head to the voicemail on your iPhone.
- Tap the Share icon (it looks like a box with an arrow pointing up).
- Choose AirDrop from the sharing options that pop up.
- Tap on your Mac from the list of available devices.
And that's it. The voicemail lands in your Mac's Downloads folder as a neat .m4a audio file. There's no need to open your email or wait for a cloud service to sync; it's a direct transfer between your devices. Perfect for those time-sensitive moments.
AirDrop creates a direct, peer-to-peer connection for file transfers. This not only makes it exceptionally fast but also highly secure, as the file isn't routed through an external server. It’s the digital equivalent of handing a physical document to someone in the same room.
Effortless Syncing with iCloud
For a more automated, "set it and forget it" approach, iCloud is your best friend. This method works beautifully if you're not in a mad rush and prefer your files to just appear on your Mac without any manual transfers.
The trick is to first save the voicemail to an iCloud-enabled app on your iPhone. Your two best bets here are the Files app and the Voice Memos app.
When you share a voicemail and choose "Save to Files," you can pop it directly into your iCloud Drive. A few moments later, that exact file will be sitting in the iCloud Drive folder within Finder on your Mac. Simple.
Likewise, sharing a voicemail to the Voice Memos app adds it to your library of recordings. Since Voice Memos syncs via iCloud, it won't be long before the recording shows up in the Voice Memos application on your Mac, ready to be played, saved, or organised. This creates a brilliant, nearly effortless backup system for your most important messages.
Practical Ways to Save Voicemails to a Windows PC
If your main computer is a Windows PC, you might assume that getting your iPhone voicemails saved will be a massive headache. Thankfully, that’s not the case at all. There are actually a few rock-solid ways to bridge the gap between iOS and Windows, making sure you can back up those important audio files without needing a Mac.
The most universal and straightforward trick in the book is simply emailing the voicemail to yourself. It’s a classic for a reason—it just works, every single time, no matter what computer you're using. All you have to do is use the Share Sheet on your iPhone, pick your email app, send it to your own address, and then download the attached .m4a file on your PC. Easy.
Using iCloud for Windows for Automatic Syncing
For anyone after a more integrated, "set and forget" solution, getting iCloud for Windows is a fantastic option. It's a free app from Apple that brings a slice of their ecosystem over to your PC, creating a seamless sync for your files.
Once it's installed and set up, any voicemails you save to the Files app on your iPhone (and pop into the iCloud Drive folder) will automatically show up on your PC. It creates a dedicated iCloud Drive folder right there in your Windows File Explorer, mirroring what you see on your phone. This means no more emailing files one by one. Just save it on your phone, and it’ll be waiting for you on your computer.
Leveraging Other Cloud Services
Not keen on using iCloud? No problem at all. Plenty of other popular cloud storage services work just as well as a middleman between your devices. Services like Dropbox, Google Drive, or OneDrive are perfect for this.
The process is almost identical to using the Files app:
- Make sure you have the cloud service's app (like Dropbox) installed on your iPhone.
- From the Voicemail screen, tap that little Share icon.
- Choose "Save to Dropbox" (or whatever your preferred service is) from the list.
- The audio file will then upload straight to your cloud account.
After that, you can just open the Dropbox folder or website on your Windows PC and download the file directly. This method is incredibly flexible and uses tools you probably already have.
For businesses juggling multiple lines of communication, having a robust system in place is key. You can explore different options by checking out our guide on call management software that can help organise these workflows.
The core idea behind all these methods is creating a simple bridge. Whether you use email, iCloud, or a third-party cloud service, you’re basically just putting the voicemail file in a spot that both your iPhone and your Windows PC can get to, making the transfer effortless.
This approach is especially useful for professionals like real estate agents or mortgage brokers who are constantly getting important client updates via voicemail. Keeping a secure, organised record of these messages on a PC isn't just good practice—it's essential for clear record-keeping and sorting out any potential disputes down the line. By picking the cloud method that fits your workflow, you can make sure every critical message is safely archived and easy to find whenever you need it.
When Third-Party Transfer Software Makes Sense
Look, the built-in iPhone tools are fantastic for saving that one special message from a loved one or a crucial instruction from a client. But let's be real—they completely fall short when you're facing a mountain of voicemails that need archiving.
Trying to save a large number of messages one by one isn't just a bit slow; it's a soul-crushing time sink. This is exactly when dedicated third-party software stops being a nice-to-have and becomes an absolute necessity.
Think about it. Maybe you're a real estate agent who needs to document every client conversation for legal reasons. Or perhaps you're a tradie archiving months of voicemails related to specific jobs. Sifting through dozens, or even hundreds, of messages individually is a non-starter. A good desktop app can turn that nightmare of a task into a few simple clicks.
The Magic of Bulk Exporting
The single biggest win with these programs is their ability to handle everything in bulk. You connect your iPhone to your computer, fire up the software, and you're typically greeted with a clean, user-friendly interface showing all your voicemails in a neat list. From there, you can browse, sort, select, and export every single message you need in one go.
This completely changes the game, especially for professionals where time is money. Instead of chipping away for an hour sharing files to yourself, you can get your entire voicemail inbox safely archived in a matter of minutes.
Most of the reputable tools also offer powerful features you just don't get with the native methods:
- Keeps All the Important Details: They often preserve the original metadata—like the sender's phone number, date, and timestamp—which is absolutely vital for proper record-keeping.
- You Choose the Format: Many let you pick your preferred audio format, like MP3 instead of the default M4A, giving you much broader compatibility with other software and devices.
- Goes Straight to Your Hard Drive: The software accesses your phone's data directly (usually from a backup file), allowing you to pull the files straight to your computer without messing around with emails or cloud storage.
Weighing Up the Pros and Cons
Of course, this kind of convenience usually has a price tag. While you might find some basic free tools, the most reliable and feature-rich options are typically paid products. What you're really paying for is a massive shortcut and a more robust set of features.
For professionals, the small cost of transfer software is easily justified by the hours of administrative drudgery it eliminates. The ability to create a complete, dated, and organised archive of client communications is invaluable for settling disputes or just keeping meticulous records.
It's also natural to feel a bit hesitant about giving a third-party app access to your phone's data. That's why it is absolutely crucial to choose well-reviewed, reputable software from a trusted developer to keep your information secure. If you're dealing with sensitive business messages, you might also find that having them transcribed adds another layer of usefulness. You can learn more about how a voicemail to text service can work alongside your archival efforts.
In the end, the choice boils down to volume and value. If you only need to save the odd voicemail here and there, your iPhone's built-in tools will do the job just fine. But if you regularly need to save voicemails from your iPhone to your computer in large batches, investing in specialised software is without a doubt the smartest and most efficient way to go.
Your Voicemail Questions, Answered
As you get the hang of saving voicemails from your iPhone, a few questions always seem to pop up. Getting these details straight from the start can save you a world of headaches down the line. Let's run through some of the most common ones we hear.
One of the first things people want to know is what kind of file they're actually dealing with. It makes a big difference when you're thinking about how to store it and play it back later.
What File Format Are iPhone Voicemails Saved In?
When you share a voicemail from your iPhone, it lands on your computer as an .m4a audio file.
Don't let the file extension throw you; this is a super common, high-quality audio format. The best part? You won't need to hunt down any special software to listen to it. It’s compatible with pretty much every standard media player out there on both Mac and Windows—think QuickTime, Apple Music, Windows Media Player, and the ever-reliable VLC player. Just double-click the file, and you're good to go.
This universal playback makes archiving your voicemails incredibly straightforward, no matter what computer you or your colleagues are using.
Can I Recover a Voicemail I Already Deleted?
This is a tricky one. The honest answer is "maybe, but you really shouldn't rely on it." When you delete a message, your iPhone usually shuffles it over to a "Deleted Messages" folder in the Voicemail tab.
If you find it there, you can restore it with a simple tap. But here’s the catch: that folder is only temporary. Your mobile carrier—not Apple—decides how long those messages hang around before they're gone for good. It could be a few days or maybe a couple of weeks. Once the carrier purges it, it’s gone forever.
Saving your important voicemails proactively is the only surefire way to keep them. Treating the 'Deleted Messages' folder as a safety net is a gamble that almost always ends in losing the message permanently.
What Happens to My Voicemails if I Switch Phone Carriers?
You will almost certainly lose all of them. This is a critical point that catches a lot of people out. Your voicemail box is a service managed entirely by your mobile carrier, like Telstra or Optus. It has nothing to do with your iPhone itself.
When you switch to a new provider and move your number across, your old service gets cut off completely. That includes your old voicemail account and every single message stored inside it. Your new carrier sets you up with a fresh, empty voicemail box.
It's absolutely essential to save any voicemails you need to keep before you make the switch. Once that old account is closed, there's no way back. Think of it like moving house—you have to pack your important belongings before you hand back the keys.
Tired of sifting through messages and stressing about lost client details? OnSilent organises your call management so you can focus on what you do best. See how OnSilent can save you time and keep your communications in order.